Keg Refrigerator Build
Building a keg refrigerator is a good way to get draft beer at home, especially if it is your first kegerator. The build is low cost and relatively easy to complete.
Each kit will come with detailed instructions . There may be some small differences from kit to kit depending on the manufacturer. It is important to follow the instructions provided with the kit.
Below is an overview of a keg fridge build. This should give you enough understanding to decide if you are up to the challenge...It's actually pretty easy.
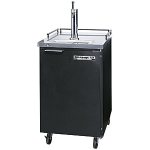
Step 1 - Select A Refrigerator
You will need to get a refrigerator for this build that will fit the size of keg or multiple kegs that you want on draft. To keep the price down most people buy a used fridge.
A good place to start is an online classified add site or a local used appliance store.
For this build, the refrigerator will only hold one 1/2-barrel keg at a time.
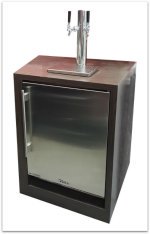
Step 2 - Select A Kegerator Kit

At this point, you have your refrigerator and know how many kegs will be on draft at a time.
It is time to purchase your kegerator kit.
The kit should be designed for the number of faucets that will be used at one time.
For this keg refrigerator build, the kit is a single faucet system.
Step 3 - Mount The Shank

You will need to drill a hole through the fridge door where the faucet will mount.
Drill a hole at a comfortable pouring height for the faucet mount. Also check the inside of the door for interference issues. Push the shank through the hole with the flange side on the outside.
Screw on the nut on the inside and tighten with a hex wrench.
Step 4 - Attach The Drip Tray

Line up the faucet with the shank and tighten the nut onto the faucet with the faucet wrench. Screw the tap handle on to the faucet.
If you have a drip tray in your kit, attach the drip below the faucet. Use the attachment hardware provided with the kit.
Step 5 - Run The Beer Line

Attach one end of the beer line to the end of the shank. Make sure there is a gasket between the shank and the hex nut and tighten.
Attach the other end of the beer line to the beer tap. Make sure there is a gasket between the shank and the hex nut and tighten.
Step 6 - Run The Gas Line
Attach one end of the gas line to the beer tap. Make sure there is a gasket between the shank and the hex nut and tighten.
Attach the other end of the gas line to the CO2 regulator. Make sure there is a gasket between the shank and the hex nut and tighten.
Step 7 - Connect the CO2 Tank
Attach the CO2 regulator to the CO2 tank. Make sure there is a plastic washer between the regulator hex nut and tank connection, then tighten.
Step 8 - Tap The Keg
Make sure the lever on the keg coupler is in the up position. Place the keg coupler into the connection on top of the keg.
Twist the coupler clockwise until it hits the stop. Push the lever down to tap the keg.
Make sure the CO2 tank is turned on an the gage is set per the manufacturers recommendation.
Step 9 - Pour Your First Beer
It's finally time to pour that first beer. Pour with the glass at a 45 degree angle until the glass is 2/3 full. While the beer is still pouring tilt the glass back to vertical and finish off the glass. This will leave your beer with about 1" of head on top. This is desirable.
A well carbonated and dispensed beer should have a head on top. This adds to the beer's aroma and lets you know your beer isn't flat.
Still having some trouble understanding the keg refrigerator build?
Don't worry, this was just an overview.
Full detailed instructions come with each kit that will walk you through the entire build.
Congatulations! You are now the proud owner of a fully functioning keg refrigerator.
Please subscribe to my free Kegerator Guide E-zine
Like This Site?
Please subscribe to my free Kegerator Guide E-zine
Recent Articles
-
Beverage Air Kegerator
 The Beverage Air Kegerator is one of the best available. They are comercial grade kegerators that found in most bars and restaurants.
 -
Which Beer Kegerator Is Right For You
 Need help choosing the right Beer Kegerator? This site will help you buy the right kegerator to fit your budget.
 -
Beer Keg Dispenser Brands
 You want that perfect beer keg dispenser but not sure which brand. No worries, I’ll guide you through it.
New! Comments
Have your say about what you just read! Leave me a comment in the box below.